Hello! I’m back for the second installment of my adventure: Cracking the Code of OSCAL’s Technical Architecture. In our first post, we covered the “why”—my background as a Marine veteran, and my drive to fix the “immediately outdated” paperwork of the RMF. Today, we’re moving from the why to the how. We are going to open the hood and look at how these files are structured, how they talk to each other, and finally answer that big question from last time: What exactly happens in the Assessment Layer?
In today’s episode of my personal level up, I want to discuss how these different files are structured and what they accomplish. Now I haven’t forgotten about the goal from the last post, which was to learn more about the Assessment layer to get a better understanding of what it does and how it is used in the grand scheme of things. So we will be covering the structure and I will provide what I learned through my research on the Assessment layer.
Before we look at specific models, you need to know that every OSCAL file shares a common “DNA.” Two things are always present:
Think of the UUID as a digital Social Security Number. Every file, control, and component has one. This is the “glue” that allows us to make changes in one file and have them correlate perfectly in another.
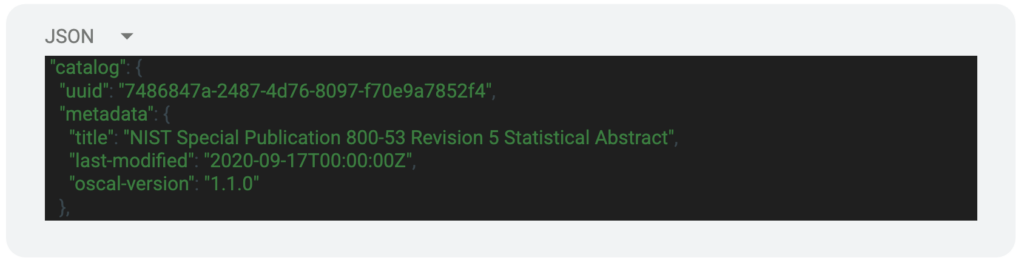
Directly after the root, we have the Metadata. This is the ID card of the document, containing the title, last-modified date, and the version. It looks like this:
After the metadata we have the “Body” of the file. This varies depending on the model of the file we are looking at. Let’s take a look at the different model types and what is included in the body of those files.
The body section of the Catalog model includes various parameters that relate to the different controls in the NIST 800-53 control catalogs. Here is a simple example of this section:
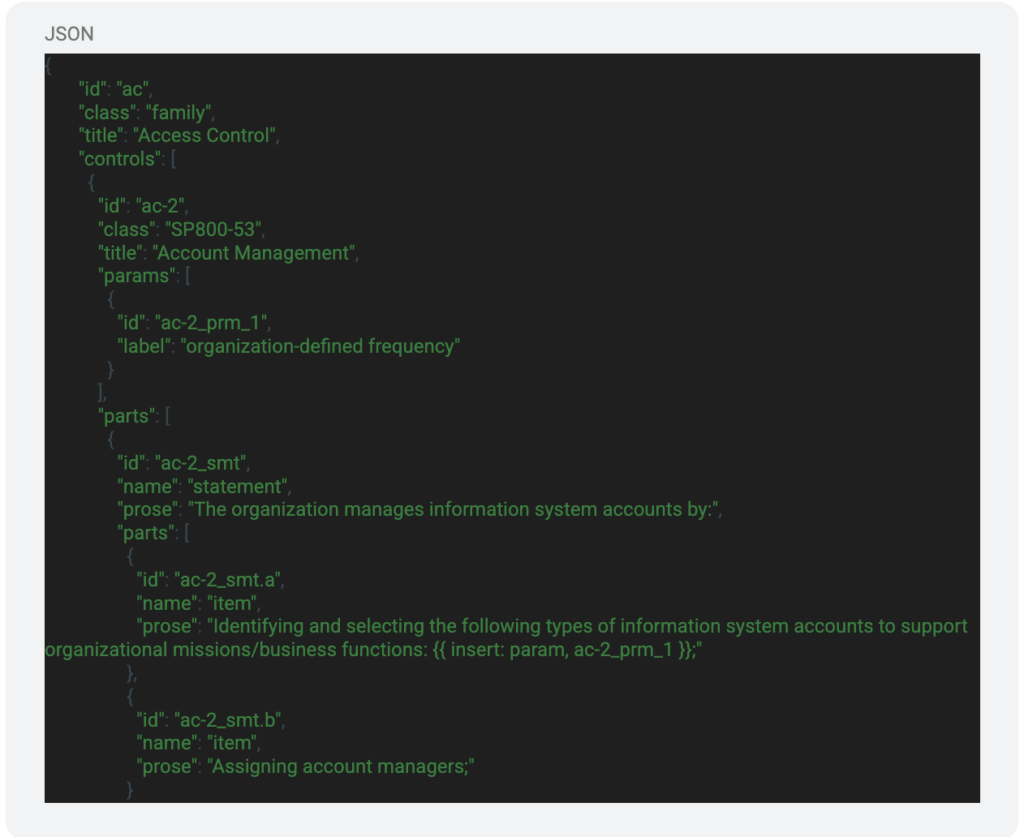
In this section of JSON, we can see a couple important variables. These variables are used to identify the control family, various controls, and the parameters regarding those controls. Within those fields there are some sub-fields that provide more information that can be used to interact with the file.
In the Profile Model, the body section includes the control IDs that are applicable to the system that is being documented. You can include as many or as little as needed, this will be based on the baseline that your system needs to meet. There are also sections that allow you to make modifications to the controls such as the parameter values. These can be seen below:
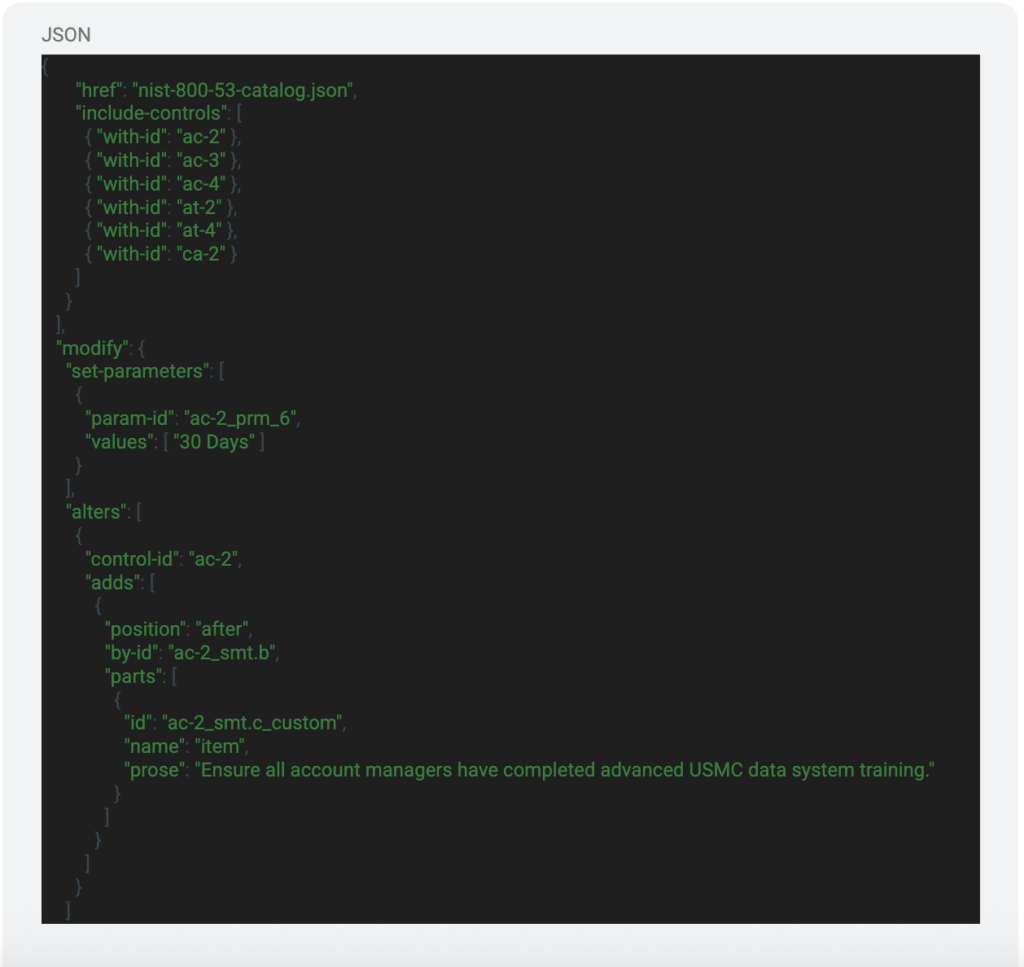
We see the section that is labeled “include-controls”, this is the list of controls that will be extracted from the catalog and stored in the resolved profile. Under that we can see some modifications being made to the parameters of AC-2, specifically “ac-2_prm_6”. This parameter answers for h.1 in the control description of AC-2 which is “[Assignment: organization-defined time period] when accounts are no longer required.” So the “30 Days” value will be the defined value for that parameter in the resolved profile and eventually the SSP. You can also make alterations to the different parts of the controls. We can see the alteration made to “ac-2_smt.b”. This would be specific to the system that is being documented but this is another way that you can make changes and load a lot of work during the initial creation of the OSCAL SSP.
The Component Definition is the file that will define various components of the system that answer for controls within the system. Here is an example of the body section:
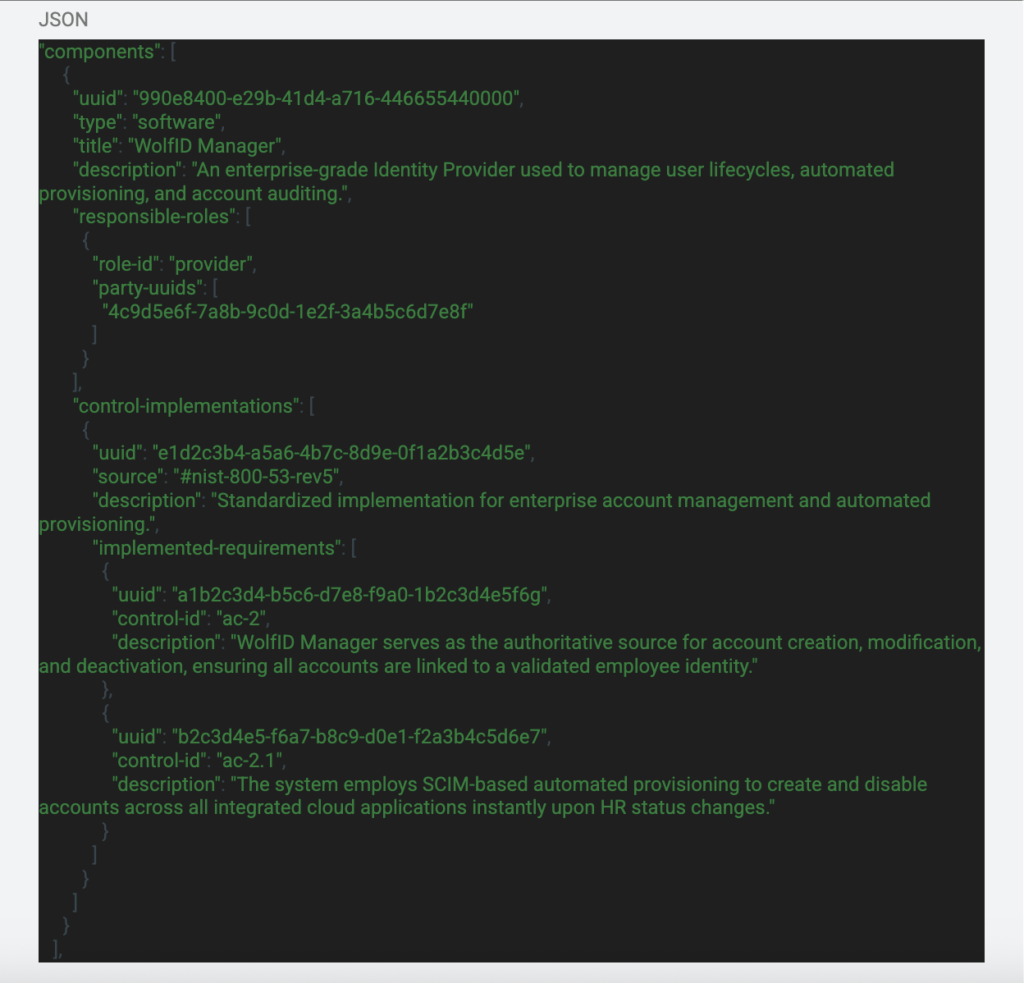
In the beginning of the body section we can see the component being declared. We add some information about the component such as a description of the capability, the name of it, and even the responsible roles associated with that component. This gives a great view of what the capability is and who to talk to if there are any questions. Under that section we can see what controls that component answers for and how it answers for that control. This correlation is very important because this allows us to modify control implementations and evidence based on the information that is in this file for these components. Also, further in this series I will be exploring the use of automation to gather component configuration to then update the SSP in real time which using this file will be extremely important to that process. You might be wondering, “How are you going to reference these in different files?” This is a great question and I will give you the upfront “easy” answer which is that we will be using the UUIDs and other parameters like the “title” parameter that are unique.
The SSP consists of information from the three files that we just discussed. Below is the example of that file:
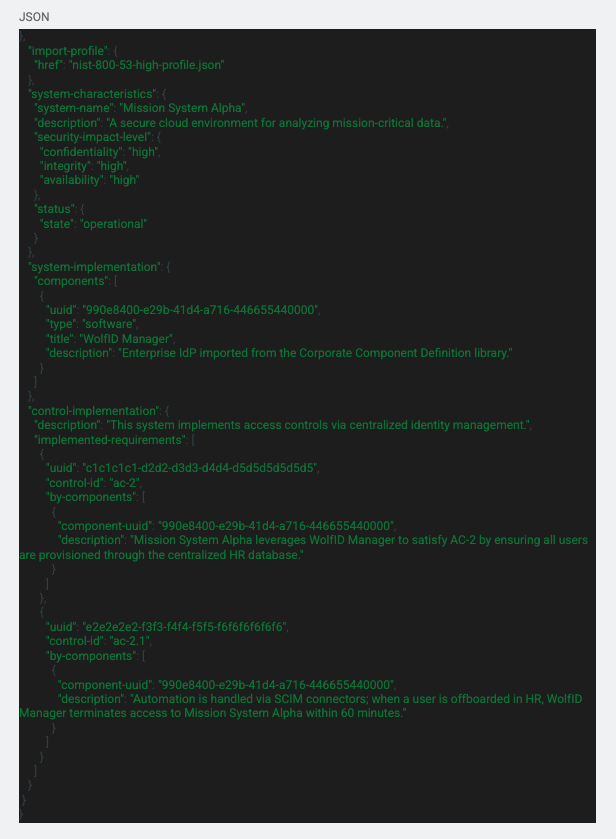
Starting at the beginning of the file, there is an import statement that is importing the profile with the reference link to the file. Under that we have the “system-characteristics” section that gives important general information about the system including the CIA impact levels, status of the system, and other properties. Under that section we have the “components” which we discussed in the Component Definition section above. Under that we have everyone’s favorite section of the SSP, the control implementation section. This is where all the control statements, parameters, and implementation statements are stored and referenced.
The Assessment Plan file holds instructions for how each control or component will be assessed. Below is an example of the body section:
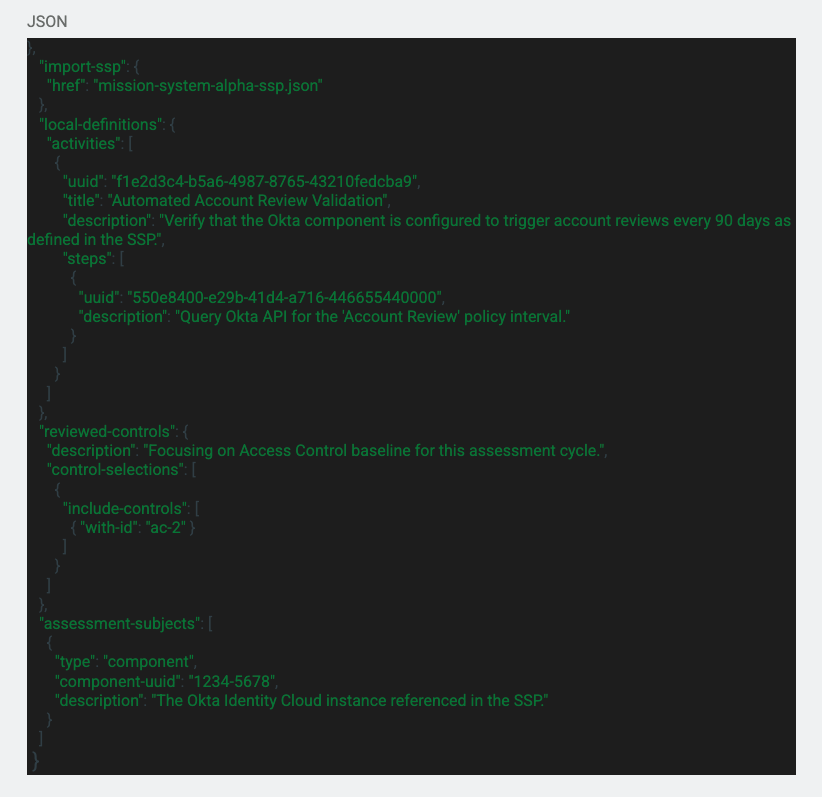
As we go through this code snippet, I will be giving that information that I learned throughout my research. We can see another import statement at the top which is referencing the SSP of the system. Under the import statement there is a section called “local-definitions”. This is a section that can be used to incorporate any missing or inaccurate data that is either missing or in the SSP. Then there is the “reviewed-controls” section that includes the controls that will be included in the assessment. This also includes the assessment methods and control objectives that are found in the Catalog file. Under the controls that will be reviewed, there is the “assessment-subjects” that identifies the components, locations, inventory items, or even parties or personnel that will be assessed. In the Assessment Plan you can also include the “assessment-assets” which are the tools that will be used to perform the assessment. You can also include the “task” section which is used to provide the intended schedule for milestones and assessment actions.
In the grand scheme of things, the Assessment Plan is used as a guide or instruction set for the assessment. This can be extremely helpful to the assessors and even the system maintainers to understand what the assessment will include and how it will be conducted. This also serves as a record of the plan.
The Assessment Results are exactly what you think, it is a file that stores the results of the assessment. Below is an example of the Assessment Results:
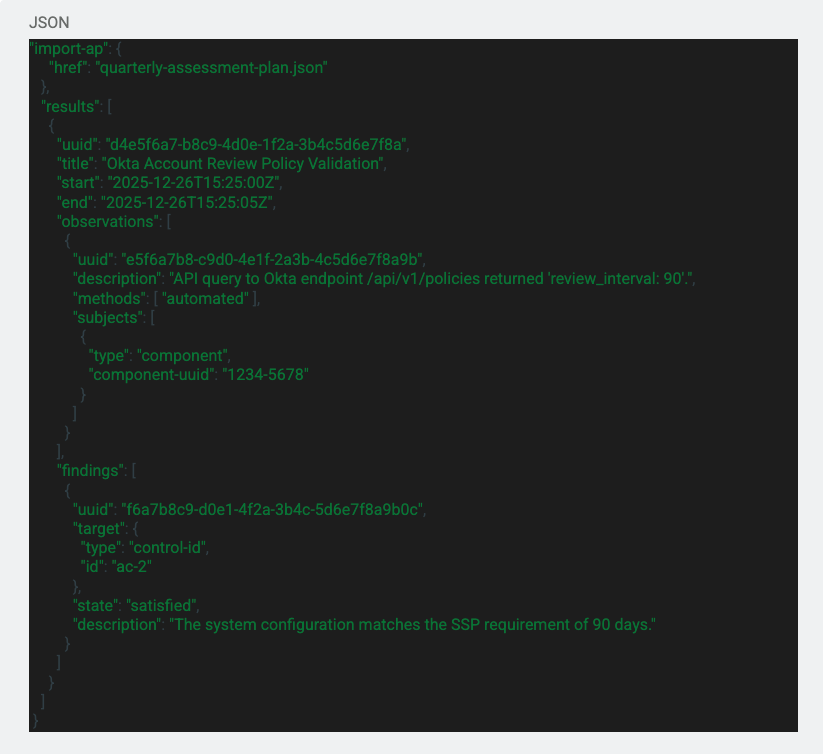
Again we can see the import statement at the top which is importing the Assessment Plan file. These import statements allow you to correlate each file and see how they are applicable to each other. We then just go into the results of the assessment that outlines what was found for each control. There are many other fields that can be included in the results section such as the local definitions, reviewed controls, assessment subject, assessment assets, attestation, assessment logs, observation, risk, and finding.
The last file type is the POA&M file. The POA&M file is used to document and identify the actions that need to be taken to mitigate or fix any findings that were found during the assessment. Here is an example:
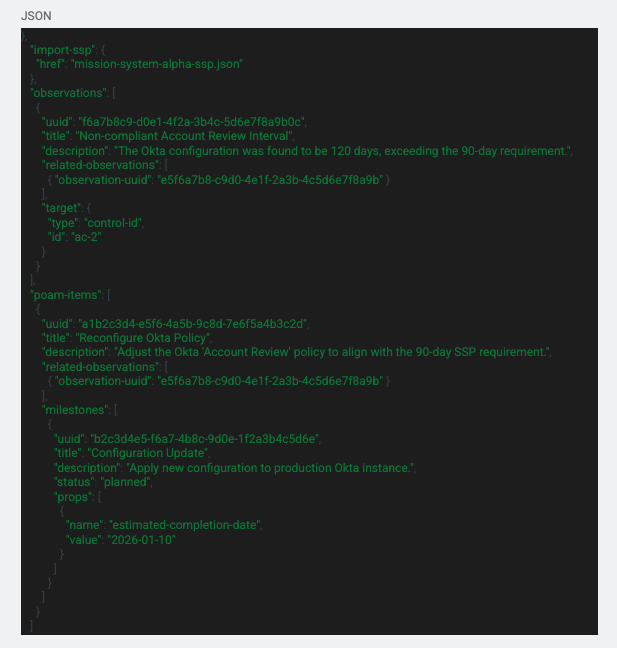
Again, we import the SSP for reference. Under that we have the “observations” section that outlines the assessment and what was found during it. This can even include notes from the assessor or system administrator. Under that section we get into the “poam-items” section that defines the actions and milestones that will be done to mitigate the risk of the found deficiency.
I know, I know—that was a massive “firehose” of information. Ingesting that much JSON in one sitting is enough to make anyone’s head spin. If you need to hit the “reset” button, take a second to re-read the sections above or dive into the Resource Vault I’ve linked below.
The goal isn’t to memorize the schema; it’s to understand the logic. Once you see how the “glue” (the UUIDs) connects the rules to reality, the paperwork starts to disappear.
In the next episode, we’re moving out of the classroom and into the lab for the fun stuff.
I’m currently building out a POC (Proof of Concept) suite of scripts to show you how these documents actually “live.” To keep things clear, we’re going to start with a “Manual Pivot”:
We are officially “cracking the code” and getting closer to the Living SSP. I’m diving into the deep end—care to join me?
See you in the next one.
NIST OSCAL Content Github
https://github.com/usnistgov/oscal-content/tree/main
NIST OSCAL File Examples
https://github.com/usnistgov/oscal-content/tree/main/examples